The purpose of Think Back Thursday is to link up a photo post about something from the past. You can reach back all the way to your childhood and bravely post pictures of you in your wild clothes and hair styles or post something from last year and tell us about it. I'm not picky. Hey, even yesterday was the past... LOL I hope you will join us.
Playing with Photos
For the next 4 weeks I will be leaving my photos larger than usual. I want you to be able to see details, if you choose to. So if you want to see things more closely then click any photo.
I use Picasa to edit my photos.
I want to start by saying I have no affiliation with Picasa. They have not asked me to do this review... nor have I received anything for doing it. I am doing this because I love this program and wanted to share the program with my readers.
I love the new features they recently added. I thought it would be fun to take a few weeks and share the program with my readers. I had showed this program to a friend and she was impressed by what it could do but had never heard of it before.
Oh, and by the way.. the program is FREE!!
Just click any of the Picasa links.
There are 5 tabs in the Picasa program plus some extra features at the top and bottom of the page. I will be doing 2 tabs today... plus one feature from the top of the page and one features from the bottom of the page that you might like to use when first editing a photo. Next week I will do 2 more tabs. The week after I will do the last tab and maybe a few other features. The last week I will finish up with the final features.
Here is the original photo labeled...
Family 04-16-12 082
Family... date...photo # 82 taken on that date
This will be the main photo used this week.
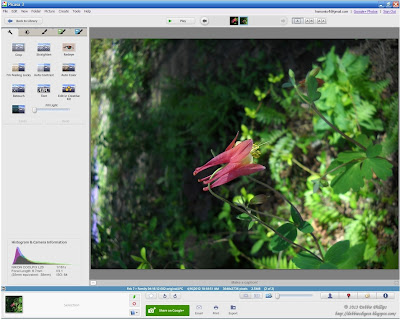
This is what Picasa looks like when you open it.
On the left is the folders of pictures. You can import photos from your camera, from your scanner or from other media. You can also open files or folders with photos you already have saved on your computer. To choose a photo to edit you can locate the file and then right click and choose open with Picasa or you can open Picasa and choose the folder/file/photo you want to edit.
Here is the Screenshot of tab one of Picasa where I opened the original photo.

In the upper right there are buttons that change the way you see your photos.
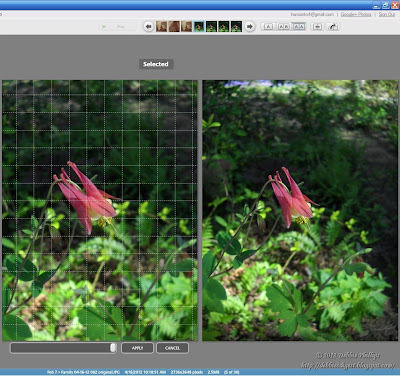
You can choose just 'A' which is like the photo above. You see only one photo at a time. Or, you can choose 'AB' where you see the photo you are working on and the next photo in that file (I have never used this... I don't see the advantage of it) OR, you can choose 'AA' like the photos below.
With the view as 'AA' you can view the changes you make to the photo compared to the original beside it. You can see more details of this below.The buttons next to the 'A', 'AB' and 'AA' buttons show the photos next to each other horizontally or vertically... which may help if the photos are taller or wider.
I labeled the steps I took as I edited the photo so you would know when I had moved on to a new feature. There is no right or wrong order... this is just the order I used the buttons.
The first thing I like to do with my photo is to rotate it.
This is a close-up of the bottom the program. These can be accessed when any of the tabs are open.

Do you see the little circular arrows. The left one pointing counterclockwise and the one next to it pointing clockwise. That is self explanatory. Click whichever one you need and if you are not sure just keep clicking one till the photo is the direction is should be or the direction you want.
Step 01
Photo Rotated
Here is a close-up of the Screenshot of tab one of Picasa, cropped to show the tabs in the upper left corner. With this close-up you can see the features that you have access to on tab one.

I will be going over each one and showing what it can do.
Step 02
Straighten
Besides rotating, which I showed you above, you can also straighten a photo from a feature on this page.

I did not need to use this feature for this photo but you can see how the flower on the left is rotated a little. You just push the Straighten feature and then slide the little white button back and forth till it looks the way you want it to.
Step 03
Auto Contrast
This feature is for those who don't know how the contrast should look... just one click and it sets the contrast for you.
Step 04
I'm Feeling Lucky
Step 05
Auto Color
I undid the "I'm Feeling Lucky" from above and did the Auto Color. This time they came out very similar... sometimes they don't. Sometimes I like Auto Color better.
Step 06
Cropped
Here you can crop the photo anyway you want. This one came out very well when cropped. The close-up is very clear. I usually take a few photos of flowers when I know I will probably want to crop them. Sometimes my hand shakes and it makes the cropped photo look blurry.
07
Add Text feature
This is a screenshot of the Add Text feature. You can do a lot with this. You just push the button and then type. You can change the font, the color of the words, use 2 colors even change the thickness of the 2 colors.
One Color Text
Two color Text (different text)
Step 08
Fill Light
Fill Light brings out detail in the dark background and shadow areas of your photo. Also, you generally need very little to make the photo look better.
Fill Light really bright
As you can see from the 2 photos you can do alot of adjusting with the fill light. It is a sliding button so you can go from the original to very light... I don't like it as light as the second one... it was just to show the differences.
Step 09 Repair photos
On tab 1 of Picasa there is also a feature that allows you to repair photos.
To show you this I chose another photo that has scratches on it.
Deb and Tuffy01
Close up of scratch
Screenshot of repair photo 01
When you repair a photo the program zooms in. You can adjust the amount you are zoomed in by sliding the slider bar that is located on the lower left. You can move the area you are zoomed in to by moving your cursor around in the little box on the lower left. You can also enlarge or shrink the area you repair. That is on the upper left. The circle gets larger and smaller.
Screenshot of repair photo 02
Deb and Tuffy01 scratch fixed on arm of chair
Step 10
Redeye Fix
Sometimes this works well and sometimes not. If you want to see the difference here you will have to look at the original and this photo larger (by clicking on them)
Back to the same photo as up top...
Screenshot of tab 2
Close up of upper right of tab 2
so you can see the features.
Top line is Fill light and that is the same as on tab 1.
Step 11
Highlights
This is not quite the same as Fill Light.... It just lightens the lighter portions of the picture. I don't know if you can see the difference but you can play with the photo to get it like you want it. Highlights can make your photo look washed out if you use to much. You see how the leaves of the plant below and behind the flower look washed out.
Step 12
Shadows
This looks kinda...

Not only can you make the background lighter you can darken the shadows.
Step 13
Color temperature
Play with the overall color of you photo...
in this case I made it more purple.

Step 14
one click lighting and one click color
If you look at the 'Close up of upper right of tab 2' you will see, on the very right hand side, two little wands with lights at the end of them. One is for One Click Lighting and the other for One Click Color. It comes out looking very similar to the 'I'm Feeling Lucky' feature if you click them both.
That's it for today!!

I hope you enjoyed this look at the first 2 tabs of Picasa.
The other tabs have much more interesting features...
so...
stay tuned for next week...
This looks kinda...
Not only can you make the background lighter you can darken the shadows.
Step 13
Color temperature
Play with the overall color of you photo...
in this case I made it more purple.
Step 14
one click lighting and one click color
If you look at the 'Close up of upper right of tab 2' you will see, on the very right hand side, two little wands with lights at the end of them. One is for One Click Lighting and the other for One Click Color. It comes out looking very similar to the 'I'm Feeling Lucky' feature if you click them both.
That's it for today!!
I hope you enjoyed this look at the first 2 tabs of Picasa.
The other tabs have much more interesting features...
so...
stay tuned for next week...
What program do you use to fiddle with your photos?
Let us know and show some of the things the program does.
If you don't want to join in on this one... mine will be a series for all of February...
you can choose your own topics and post what you would like.
I have been wanting to do this on my blog and decided to do it for Think Back Thursday since I use a lot of photos for this meme. It will take some planning ahead to get this one ready so I am giving you all of Jan to work on it.
I have been working on this and it is going to be GOOD! I can't wait to share with you.
I look forward to seeing what you show us... whether you do Playing with Photos or your own thing.
Here are the Rules for participating:
- It can be about you, about your kids, about your parents, whomever. You can include video, I will not exclude video alone posts, but I prefer them along with photos, as this is a photo meme. I am doing a weekly theme now. That should help narrow it down from the myriad of photos we all have. For ideas check out the other posts in my label Think Back Thursday.
- Link up below. Please use a permalink that sends readers directly to the correct post. If you are not sure what that is click the word permalink for an explanation.
- Mention my blog and offer a link back. This is a requirement to take part and a kind gesture to me your hostess as well as your readers--they will know where to join in the fun, too. You can put the Think Back Thursday button on your site and in your post. You will find it on my right sidebar. Please use it to link to my site, to spread the word about my meme. Using the button will help others know how to find me and how to join. Tell others to click on the button in your post to find us here.
- Leave me a comment. First so that you can let me know what you think of my pictures and secondly so that I will know a new post has been linked up and I can come visit your blog and comment on your photos.
Join me!

all content on my blog is ©


1 comment:
Thanks for sharing. I have stopped using Picasa for editing, though at one time I used it a lot. They've upgraded quite a bit since then. I use PicMonkey now.
Post a Comment